|
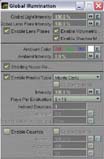
The Settings: I started with the Global Illumination Monte Carlo settings of 3 x 9 Rays Per Evaluation(RPE), with Shading Noise Reduction turned on for all renders. After the first set of renders at those settings, I increased the RPE to 6 x 18, and went as far as 10 x30, which took more than 10 hours making it the longest render. Naturally, settings beyond 10 x 30 would have been much longer. Below are renders at 3 x 9 RPE using the Galileo's Tomb Light Probe The first image (1), is a render using the 96 bit HDR. For the second render (2), I wondered if changing the Camera's Adaptive Sampling might affect the results; it only changed the stochastic pattern of the noise. In the third render (3), I increased the antialiasing to Enhanced High, which not only made the image less noisy, but also darkened it slightly. This might seem counterintuitive, but since the pixels are being averaged together by the antialiasing, it makes sense. For the fourth render (4), I changed the Light Probe from 96 bits to 24 bits since I was curious about what would happen if an image with much less dynamic range was used as a source of global illumination. While I expected the image to be darker, I didn't expect the result to be less noisy. In the fifth image (5), I simply exposed image (4) to re-map its gamut, much like a levels operation in Photoshop. Since I was working with 96 bit images in all the resultant renders, I could perform operations like that with less image degradation than one would get with a 24 bit image in Photoshop. |


