
CEC 360 Character Modeling Tutorial
Overview
When modeling a character its a good idea to have a sketch of at least two different views: one facing and one side view. With two sketches you can accuratly gauge how far to move points and polygons in relation to each other. Character modeling usually means modeling smooth organic looking surfaces and forms...and this where polygonal modeling starts to reach its limits and MetaNURBS modeling is better technique.
Part 1
An efficient approach to character modeling is to model the biggest features first and the smallest details last. The reason we will work this way is because we will gradually add subdivisions to our model as we go. Most features in a characters face can be put into one of three categories: biggest, medium and smallest. The biggest features are the overall shape and proportion of the head and the foundations for the mid-sized features. The mid-sized features are the cheek bones, the eye sockets, jawline, and ears. Some of these mid-sized features are foundations for the smallest features. Last are the smallest features—the details, such as the eyes, ear canals, furrows in the brows and lips.
Step 1
Its a good idea to start from a sketch with a face and side view. When drawing these two views, you can superimpose a grid that has three verticle and three horizontal rows to it. Most facial features can be derived from one of these squares.

TWe need to begin by making a box that has three subdivisions on each side. You can do this by using your left/right and up/down arrows to sudivide the box. The box should have three verticle and three horizontal rows in all three views.


Step 2
Hit the enter key and you will ahve a correctly subdivided box. Hit the Tab key and all of the polygons will become metaNURBS patches and your box will have a rounded look to it, If you are using Lightwave 5.6 or later(including 6) you can set a scan of your sketch as a background image which will help as you move points around as the modeling procedes.
If you're using Inspire, you can trace the features of your sketch in illustrator and place the illustrator files in background layers so you can use them as a template. This method is a actually faster than 5.6 and 6 as a background image can slow the software down.


Step 3
Lasso the top row of points in your top view and and activate the stretch tool("h" key) In the facing view click on the centerline of the face and drag, scaling the selected points towards each other. This will make the top 1/3 of the head smaller than the rest. Repeat as needed to get the proportions close to those of your sketch.

Step 4
At this point its a good idea to save as to a project folder with the usual structure(objects, scenes, etc.)
When you work with metaNURBS, you will have to convert it back to polygons later. In Lightwave 5.6 and Inspire, the Layout cannot see metaNURBS objects(although 6 can bring them in just fine).
This step which we will get to later in the tutorial will "freeze" the object, turning each metaNURBS patch into a set of polygons. This converion is in a sense one-way. So if you plan on making changes to your metaNURBS model later, save with the name and "-NURBS.lwo" so you have a copy of yout metaNURBS model in case you need to make changes later.

Step 5
Switch to the side view and move some of the bottom points forward, making the mouth and snout of the ape.

Step 6
Switch to the top view and select the indicated points and move them up in your facing view. This will emphasize the crest that many monkeys and apes have. As you do this the whole shape of the head will take on a rounded look and the boxy look it had at the begining should start to fade.


Step 7
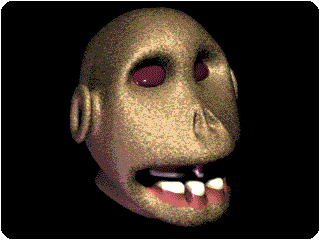
Select a row of points on the left and right of the bottom of the head and stretch them towards each other. This will round out the bottom of the jaw. At this point the head should have most of the overall shape and proportions of an ape or monkey head.

Part 2
Now that the largest features have been made, we will make the mid-sized features. Although we've moved and scaled many of the points, we can still see some of the original 3x3 grid that makes up out model. Each metaNURBS patch is one of these 3x3 squares.
Step 1
We will begin by scaling the patches individually and moving them to match our sketch more closely. The best place to start is with the bridge of the nose. Lasso the patch that is in the middle of the top 1/3 of the head in the facing view. You may need to deselect the polygon on the far side—the back of the head. This polygon is going to become the bridge of the nose. Use the stretch tool to scale it inward so it gets very narrow in the facing view. This will make the nieghboring patches—the eye sockets—closer together.


Step 2
Select the patches on the left and right of the bridge of the nose. We will bevel both of these to make the eye sockets. Activate the bevel tool("b" key) and set the inset to be about 1/3 whatever your grid unit is and make the shift be a negative value. Using negative values will make the patches bevel invard, making eye sockets. (Note: If you're using Lightwave [6], you can experiment more as the bevel and smooth shift are both interactive; i.e. you don't need to type in numbers; simply click and drag. You can also work by the numbers at any point by pressing "n," which brings up numerics for any tool in LW[6])


Step 3
After the bevel, the same patches will be selected. Use the move tool("t" key)in the side view to adjust them and make the proportions and depth of the eye sockets more believable. You may also want to rotate the patches into a better angle.

Step 4
Select the patches on the left and right side of the area below the eyes and rotate them to adjust the slope of the cheekbones. Click and rotate in the side view.

Step 5
The next step is to create a subdivision that runs vertically along the centerline of the ape's face. The reason for this step is that we need a patch on each side of the "nose" to bevel inward making nostrils. With Inspire there is no Knife tool, but using the Slice function yields the same result. To do this we need a single large polygon on a background layer. The polygon must completely clear the whole head along both the y and z axes. Make the polygon with the box tool, and make sure the box is NOT subdivided. (Note: if you're using LW[6], the Knife tool will be a faster route. To use the Knife function, hit shift-k and click on the y-axis above the top of the head and make a second click below the chin. Then turn off the knife by hitting shift-k again. There will be a subdivision running along the centerline of the head.)

Once the polygon is drawn on the second layer, switch back to the first layer and turn on visibility for the background so that the polygon is visible and hit shift-r. Choose slice and set the slice to be on the y-axis.

Hit ok and there will be a subdivision along the centerline of the head. The advantage the Slice function has over the Knife in Lightwave is that you can slice more than one part of a model at once by using 2 or more polygons on the background layer. Slicing will work on both MetaNURBS and polygonal models.(And so does the Knife tool)
Step 6
The next step is to create the base for both ears. Lasso the middle patches on both sides of the head.

Next, bevel the patches with an inset, but no shift. The numbers you use may need to be different from mine. Experiment.

Then, bevel the patches with no inset, but some shift.

This gives us the base for the ears. With the same two polygons that we've just beveled twice, we will do a second bevel that goes outward by using a negative inset making the ears larger.

Another bevel with a positive shift and no inset makes the ears have some thickness. (We can always bevel inward later on to make the ear canals.)

Step 7
Now that there is a centerline on the head, we can select a patch on each side of where the nose is, and bevel them to make the nostrils. Use small numbers here and experiment with doing your inset and shift combined into one operation and separately.

Step 8
At this point we should set up some basic surfaces. Select the patches that are in the eye sockets and be sure to have only those two patches selected. Define a surface called "Eyes" by hitting the "q" key with these settings:

Invert the selection(Shift-') and define another surface, this time called "Skin" by hitting the "q" key with these settings:

Generally, eyes are very shiny since they are wet; skin is only a little shiny and certainly not as glossy. Specularity could be thought of as "wetness." Gloss somewhat like a high or low amount of polish. More gloss makes smaller specular highlights; less and the highlights are broader.
Step 9
Select the patches that have the surface called "Eyes" and bevel them outward with a small amount of inset. This will make the eyes seem to protrude from the face a bit—but don't go too far. This is another step where you'll have to experiment.
Part 3
The last part is to add the small details like the ear canals, lips and base of the neck. We'll also add a set of teeth.
Step 1
Select some patches on the very bottom of the head. These patches will be Smooth Shifted to make the neck.

Smooth-Shifting(Shift-f) is a bit like the bevel function, but it will treat a set of neighboring polygons as though they are one. We don't get the division between polygons that we get when beveling. Smooth-Shift the selected polygons on the base of the neck. Your settings may need to differ from mine.


After Smooth-Shifting, you may want to stretch the patches to make the neck a little thicker at the base.
Step 2
At this point we have monkey that can see, but he has no mouth and his ears have no ear canals. To make the ear canals, select the polygons on the outside of the ears and bevel inward with an inset, but no shift. Set the inset so that the resulting inset patch is very small. After, bevel again with a shift, but no inset.

Step 3
Next we will make the mouth. Select four patches that are in the mouth area, below the nose and above the chin. We will Smooth-Shift these inward(negative value)and make the mouth.

For the Smooth-Shift, I used an angle of 120 degrees. The reason for this is that the geometry will self- intersect and rips will appear if the values are too small. Again, you may need to experiment to find the right value, but 120 is often a good place to start.


Do a second Smooth-Shift with the same settings, and the mouth will be deeper with the edges of the lips more prominent.

By now, you've added a lot of geometry and depending of your CPU's speed, things will start to slow down. Here is where we will hide some of the model and speed up our screen re-draw times.
Step 4
Lasso the pathces that make up the mouth and be sure to deselect the ones on the ouside of the mouth where the lips are.

Give those patches a surface called "Gums" with the following settings:

Step 5
Select the patches that have the surface called "Gums" and deselect the patches in the corners of the mouth and back of the mouth.

We will bevel the remaining patches into the bases for the teeth. At this point you may want to select the gums only, invert the selection and hide everything else to speed up the redraw.

Step 6
Use the plugin called LD_SetValue to make the lower gums' patches set to a certain value, then repeat with different values on the corresponding patches on the upper gums. Then select both sets of patches and bevel them to make the gums. Because we used LD_SetValue on both, they beveled more evenly.

Step 7
With the patches still selected, give them a new surface called "Teeth" with the following settings:

Bevel them with a small shift and no inset. Hit the "\" key to show hidden, and we now have a finished ape with giant-sized choppers.

Step 8
Now that the model is finished, save a version called "Ape-NURBS.lwo" and another called "Ape.lwo" You will Freeze(Control-d) the one called "Ape.lwo," but keep the other version as a MetaNURBs object. The reason for two verions is that converion from MetaNURBS to polygons via Freezing is one-way at a given polygonal resolution. Also, when you freeze the version called "Ape.lwo," also Triple it(Shift-t) which will convert the polygons into triangles. Models with smooth curves will render better if converted to triangles using Triple.

Coming Soon: A Dragon Tutorial